


STOP Paying for AI Upscaling
STOP Paying for AI Upscaling
[FULL GUIDE]
᛫
Nov 25, 2025
᛫
by Mickmumpitz

We needed a better, more capable video upscaler for a long while, and were dissatisfied with the pricing and capabilities offered by other upscalers so far. So we built this workflow for our future projects, with all the benefits we were seeking:
It is generative, which leads to more coherent results without weird sharpening effects.
Plug and Play: We want to upscale a lot of footage, so we need a "throw it in and just press Run" solution.
Loooong videos: No frame length limitations set by any model, and again, this workflow needs to be easy to use, so we created an automated solution.
It's free!
Installation
Download the workflow and drag it into ComfyUI. Install any missing custom nodes if prompted.
Download Models
Qwen-Image-Edit-GGUF
https://huggingface.co/QuantStack/Qwen-Image-Edit-GGUF/tree/main
📁 ComfyUI/models/unet/gguf
wan2.2_t2v_low_noise_14B_fp8_scaled.safetensors:
https://huggingface.co/Comfy-Org/Wan_2.2_ComfyUI_Repackaged/blob/main/split_files/diffusion_models/wan2.2_t2v_low_noise_14B_fp8_scaled.safetensors
📁 ComfyUI/models/diffusion_models
Wan2.2 T2V Low Noise GGUF Model:
https://huggingface.co/bullerwins/Wan2.2-T2V-A14B-GGUF/tree/main
Choose a compatible low noise model for your VRAM
📁 ComfyUI/models/unet
Wan2.2-T2V-A14B-4steps-lora-250928/low_noise_model.safetensors:
https://huggingface.co/lightx2v/Wan2.2-Lightning/blob/main/Wan2.2-T2V-A14B-4steps-lora-250928/low_noise_model.safetensors
📁 ComfyUI/models/loras
stock_photography_wan22_LOW_v1.safetensors:
https://civitai.com/models/1925758?modelVersionId=2179627
📁 ComfyUI/models/loras
umt5_xxl_fp8_e4m3fn_scaled.safetensors:
https://huggingface.co/Comfy-Org/Wan_2.1_ComfyUI_repackaged/blob/main/split_files/text_encoders/umt5_xxl_fp8_e4m3fn_scaled.safetensors
📁 ComfyUI/models/text_encoders
wan_2.1_vae.safetensors:
https://huggingface.co/Comfy-Org/Wan_2.1_ComfyUI_repackaged/blob/main/split_files/vae/wan_2.1_vae.safetensors
📁 ComfyUI/models/vae
RealESRGAN_x2.pth
Download this model via the model manager by searching for the name.
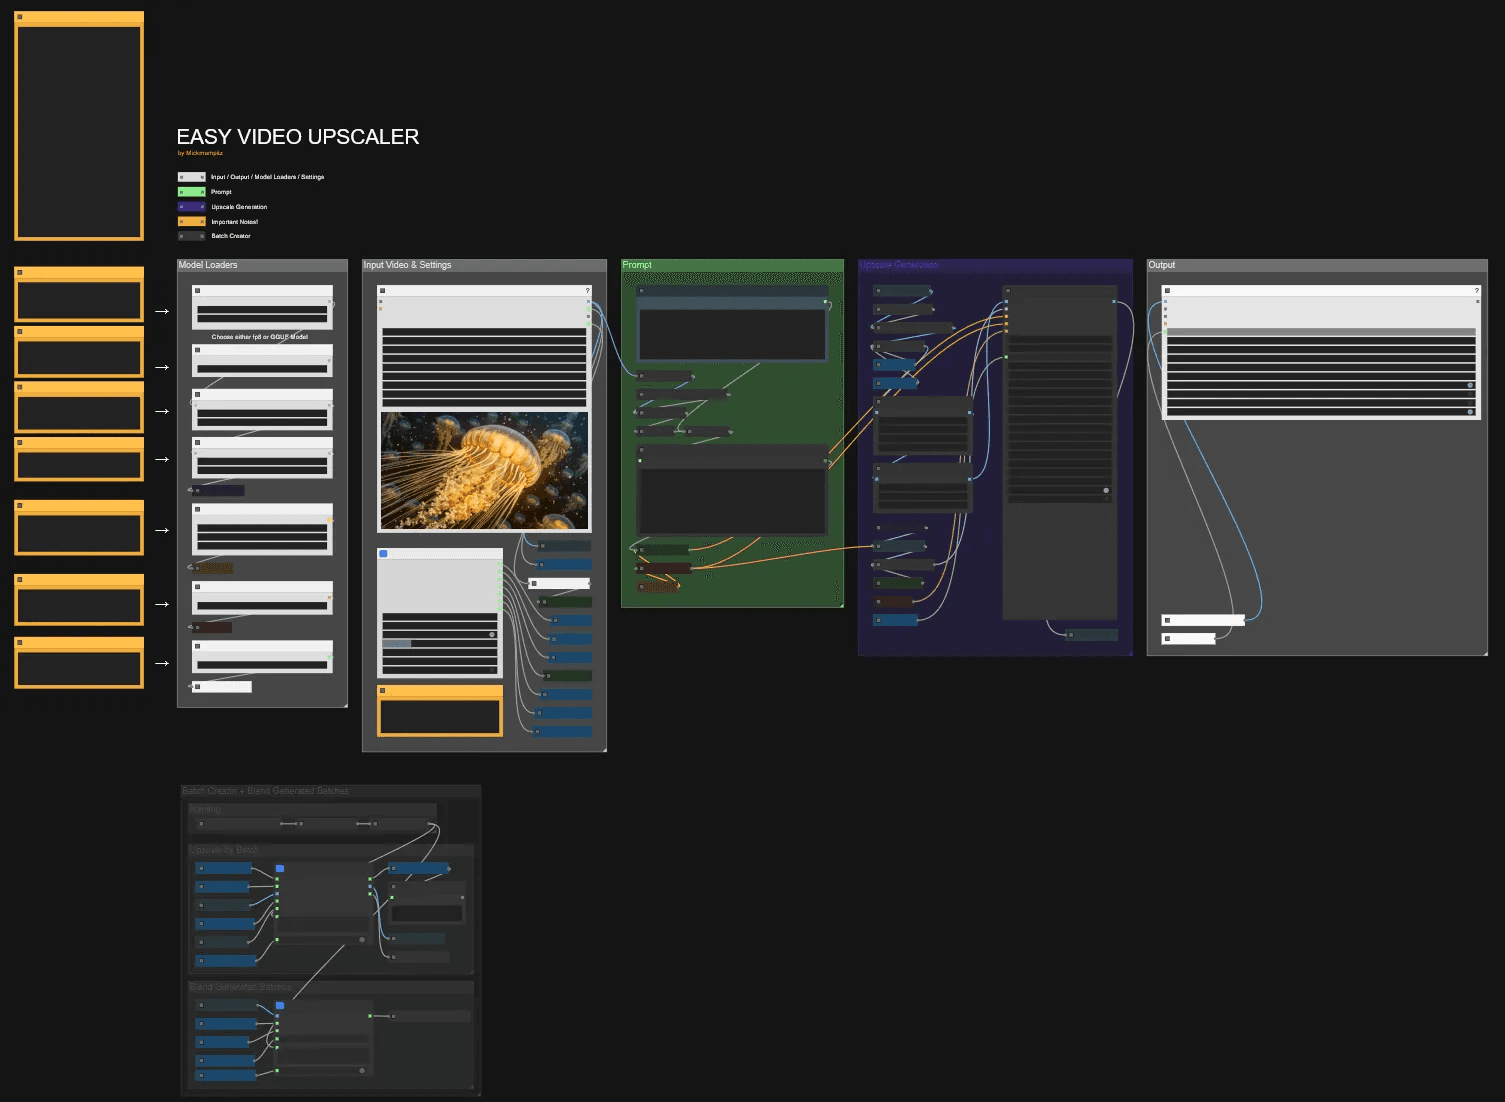
🎨 Workflow Sections
⬜ Input / Output / Model Loaders
🟩 Prompt
🟪 Upscale Generation
🟨 Important Notes
⬛ Batch Creator
Installation
Download the workflow and drag it into ComfyUI. Install any missing custom nodes if prompted.
Download Models
Qwen-Image-Edit-GGUF
https://huggingface.co/QuantStack/Qwen-Image-Edit-GGUF/tree/main
📁 ComfyUI/models/unet/gguf
wan2.2_t2v_low_noise_14B_fp8_scaled.safetensors:
https://huggingface.co/Comfy-Org/Wan_2.2_ComfyUI_Repackaged/blob/main/split_files/diffusion_models/wan2.2_t2v_low_noise_14B_fp8_scaled.safetensors
📁 ComfyUI/models/diffusion_models
Wan2.2 T2V Low Noise GGUF Model:
https://huggingface.co/bullerwins/Wan2.2-T2V-A14B-GGUF/tree/main
Choose a compatible low noise model for your VRAM
📁 ComfyUI/models/unet
Wan2.2-T2V-A14B-4steps-lora-250928/low_noise_model.safetensors:
https://huggingface.co/lightx2v/Wan2.2-Lightning/blob/main/Wan2.2-T2V-A14B-4steps-lora-250928/low_noise_model.safetensors
📁 ComfyUI/models/loras
stock_photography_wan22_LOW_v1.safetensors:
https://civitai.com/models/1925758?modelVersionId=2179627
📁 ComfyUI/models/loras
umt5_xxl_fp8_e4m3fn_scaled.safetensors:
https://huggingface.co/Comfy-Org/Wan_2.1_ComfyUI_repackaged/blob/main/split_files/text_encoders/umt5_xxl_fp8_e4m3fn_scaled.safetensors
📁 ComfyUI/models/text_encoders
wan_2.1_vae.safetensors:
https://huggingface.co/Comfy-Org/Wan_2.1_ComfyUI_repackaged/blob/main/split_files/vae/wan_2.1_vae.safetensors
📁 ComfyUI/models/vae
RealESRGAN_x2.pth
Download this model via the model manager by searching for the name.
🎨 Workflow Sections
⬜ Input / Output / Model Loaders
🟩 Prompt
🟪 Upscale Generation
🟨 Important Notes
⬛ Batch Creator
You can find the WORKFLOWS & EXAMPLE FILES here:

Before You Begin: Thank you for considering supporting us! Since these workflows can be complex, we recommend testing the free versions first to ensure compatibility with your system. We cannot guarantee full compatibility with every system that's why we always provide the main functionalities for free! Please take a moment to read through the entire guide. If you encounter any issues:
|
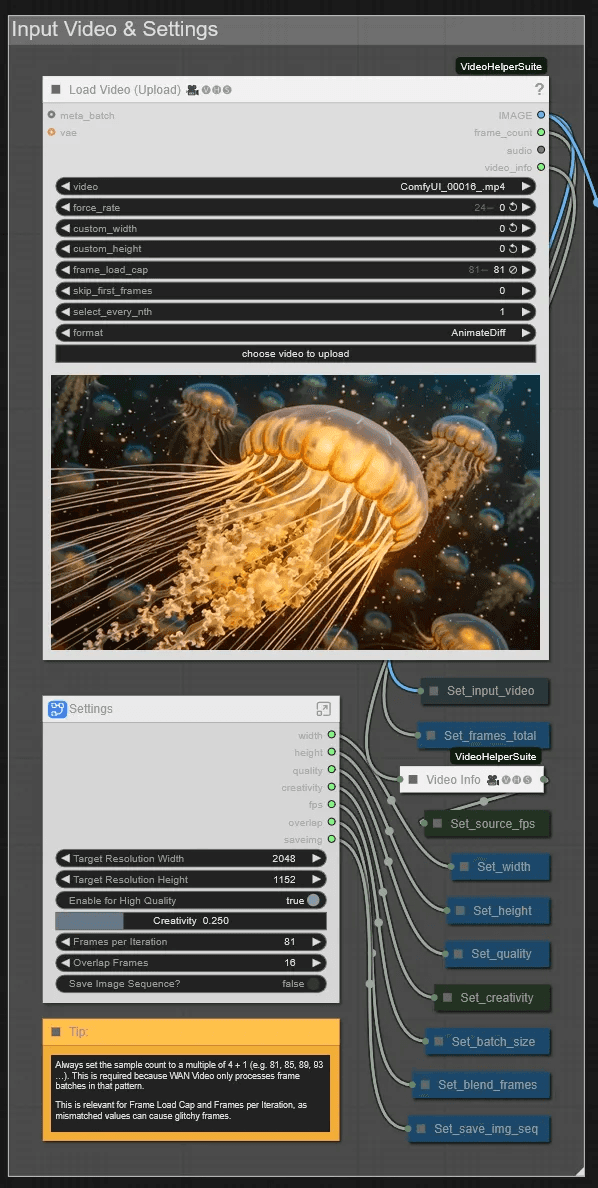
Input Video & Settings
This workflow is meant to be quick and easy to use, so you should be able to set up everything in this section.
Target Resolution: Set the target resolution width and height.
Enable for High Quality: Enabling this sets the steps of the sampler. False is normal quality with 1 step, and True is high quality with 2 steps, but takes longer to generate.
Creativity: Adjusts the shift value to manipulate the sigma for the scheduler. A lower value adheres more to the source and is less generative, and a higher value is more generative and can create more details. High values can also create noise artifacts.
Frames per Iteration: When the value is lower than your clip length, iterative sampling will activate itself automatically. Here you can control how many frames per iteration are sampled.
Overlap Frames: Set the number of extra frames generated per iteration for blending each upscaled batch. More frames will take longer to generate, but fewer frames will make the stitched parts more obvious. 16 is a good middle ground.
Save Image Sequence: Set Save Image Sequence to True if you have memory issues, e.g., with long 4K sequences. Activate it to save the upscaled output in between sampling iterations.
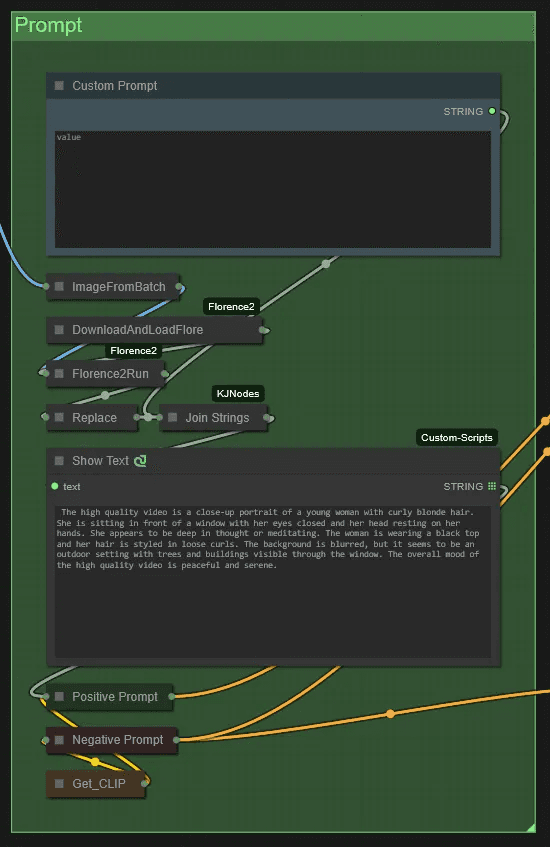
Prompt
This section creates automatically a prompt for the upscaler, so you don't need to write a custom prompt. However, we gave the option to add some custom lines.
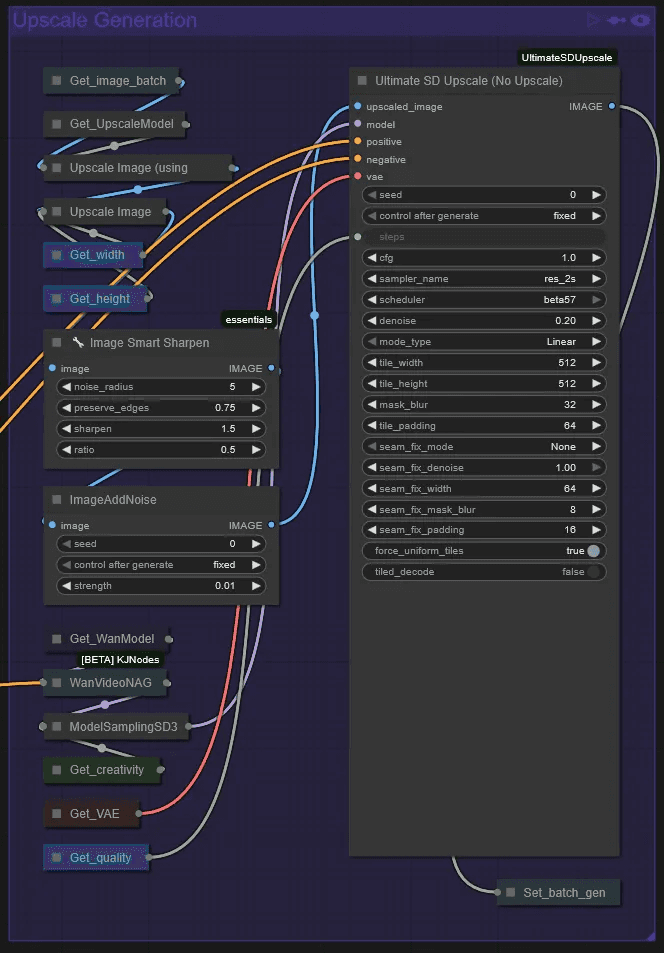
Upscale Generation
You shouldn't need to adjust anything here either. We left some options available for Image Smart Sharpen and ImageAddNoise in case you want to experiment.
If you look closely, you'll notice we're using the sampler and scheduler from Res4lyf. The results were a huge leap forward in consistency and quality!
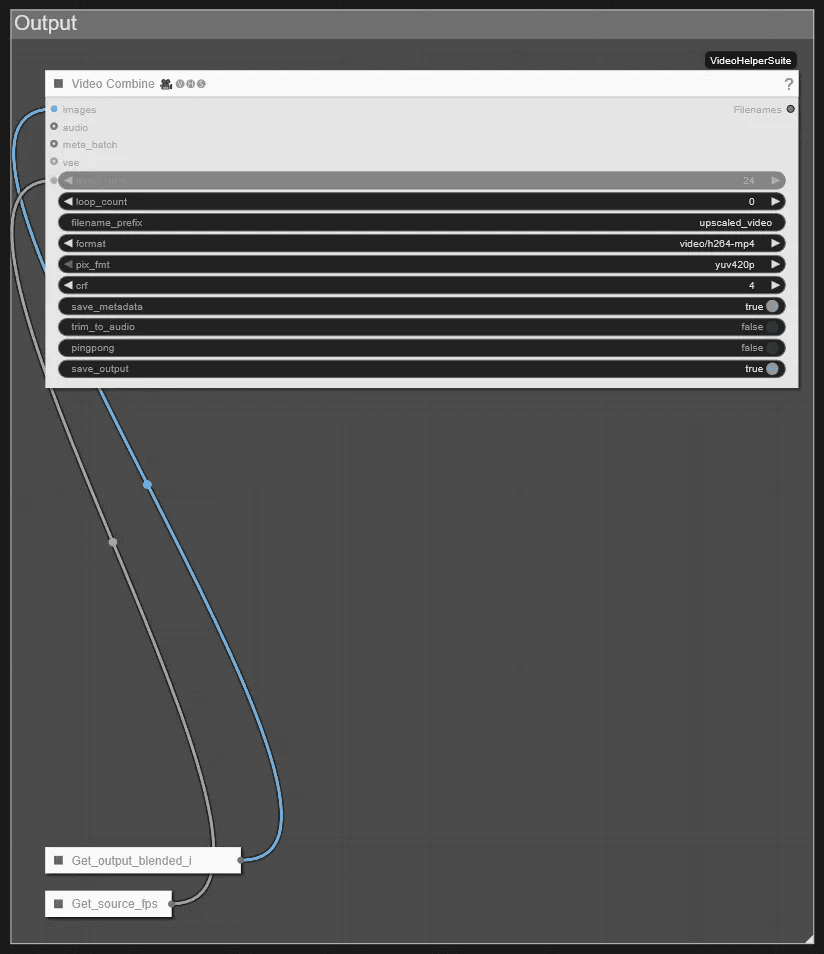
Output
This is where the video is exported. If you encounter export issues, it's usually due to memory problems with very long or 4K sequences. As mentioned in the Input Video & Settings section, save the output as an image sequence and convert it in After Effects, DaVinci Resolve, or similar software.
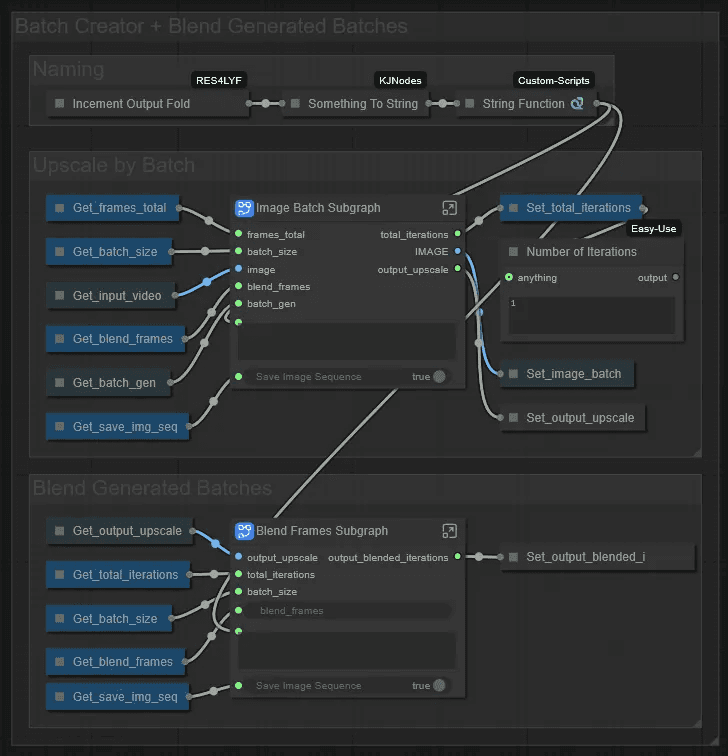
Batch Creator + Blend Generated Batches
These two subgraphs automatically handle the separation of long sequences into batches. If you open them, you'll see a bunch of math nodes. You don't need to work with this section.
Input Video & Settings
This workflow is meant to be quick and easy to use, so you should be able to set up everything in this section.
Target Resolution: Set the target resolution width and height.
Enable for High Quality: Enabling this sets the steps of the sampler. False is normal quality with 1 step, and True is high quality with 2 steps, but takes longer to generate.
Creativity: Adjusts the shift value to manipulate the sigma for the scheduler. A lower value adheres more to the source and is less generative, and a higher value is more generative and can create more details. High values can also create noise artifacts.
Frames per Iteration: When the value is lower than your clip length, iterative sampling will activate itself automatically. Here you can control how many frames per iteration are sampled.
Overlap Frames: Set the number of extra frames generated per iteration for blending each upscaled batch. More frames will take longer to generate, but fewer frames will make the stitched parts more obvious. 16 is a good middle ground.
Save Image Sequence: Set Save Image Sequence to True if you have memory issues, e.g., with long 4K sequences. Activate it to save the upscaled output in between sampling iterations.
Prompt
This section creates automatically a prompt for the upscaler, so you don't need to write a custom prompt. However, we gave the option to add some custom lines.
Upscale Generation
You shouldn't need to adjust anything here either. We left some options available for Image Smart Sharpen and ImageAddNoise in case you want to experiment.
If you look closely, you'll notice we're using the sampler and scheduler from Res4lyf. The results were a huge leap forward in consistency and quality!
Output
This is where the video is exported. If you encounter export issues, it's usually due to memory problems with very long or 4K sequences. As mentioned in the Input Video & Settings section, save the output as an image sequence and convert it in After Effects, DaVinci Resolve, or similar software.
Batch Creator + Blend Generated Batches
These two subgraphs automatically handle the separation of long sequences into batches. If you open them, you'll see a bunch of math nodes. You don't need to work with this section.
© 2025 Mickmumpitz
© 2025 Mickmumpitz
© 2025 Mickmumpitz