


AI Video with a Stick
AI Video with a Stick
[FULL GUIDE]
᛫
Dec 17, 2025
᛫
by Mickmumpitz
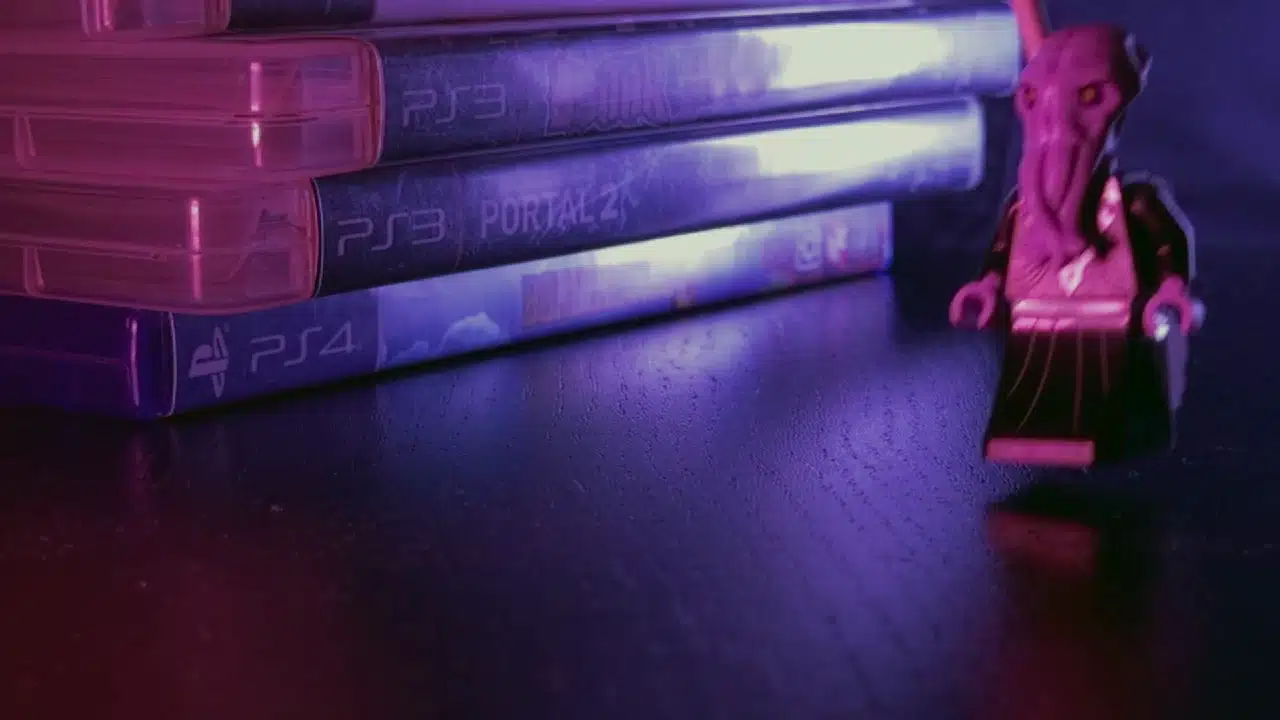
I built a workflow that lets you control AI video with a stick. You move plastic toys or printed cutouts through your scene, and the workflow erases whatever's holding them, then animates them to follow that exact motion. You can also skip the stick entirely and use animated previs instead.
I built a workflow that lets you control AI video with a stick. You move plastic toys or printed cutouts through your scene, and the workflow erases whatever's holding them, then animates them to follow that exact motion. You can also skip the stick entirely and use animated previs instead.
Installation
Download the workflow and drag it into ComfyUI. Install any missing custom nodes if prompted.
Download Models
Models for Preparation Workflow
Qwen-Image-Edit-GGUF
https://huggingface.co/QuantStack/Qwen-Image-Edit-GGUF/tree/main
📁 ComfyUI/models/unet/gguf The Q5 version is recommended!
Qwen-Image-Edit-2509-Lightning-4steps-V1.0-fp32:
https://huggingface.co/lightx2v/Qwen-Image-Lightning/blob/main/Qwen-Image-Edit-2509/Qwen-Image-Edit-2509-Lightning-4steps-V1.0-fp32.safetensors
📁 ComfyUI/models/diffusion_models
qwen_2.5_vl_7b_fp8_scaled.safetensors
https://huggingface.co/Comfy-Org/Qwen-Image_ComfyUI/blob/main/split_files/text_encoders/qwen_2.5_vl_7b_fp8_scaled.safetensors
📁 ComfyUI\models\clip\qwen
qwen_image_vae.safetensors
https://huggingface.co/Comfy-Org/Qwen-Image_ComfyUI/blob/main/split_files/vae/qwen_image_vae.safetensors
📁 ComfyUI\models\vae
sam3.pt
A free Hugging Face account is required. You must also accept the model’s terms before downloading.
You can do this here: https://huggingface.co/facebook/sam3
Approval may take some time.
https://huggingface.co/facebook/sam3/blob/main/sam3.pt
📁 ComfyUI\models\sam3
Alternatively, we have provided a sam2 section that automatically downloads its model.
Models for Time2Move Workflow
Wan2_2-I2V-A14B-HIGH_fp8_e4m3fn_scaled_KJ.safetensors
https://huggingface.co/Kijai/WanVideo_comfy_fp8_scaled/blob/main/I2V/Wan2_2-I2V-A14B-HIGH_fp8_e4m3fn_scaled_KJ.safetensors
📁 ComfyUI\models\diffusion_models
Wan2_2-I2V-A14B-LOW_fp8_e4m3fn_scaled_KJ.safetensors
https://huggingface.co/Kijai/WanVideo_comfy_fp8_scaled/blob/main/I2V/Wan2_2-I2V-A14B-LOW_fp8_e4m3fn_scaled_KJ.safetensors
📁 ComfyUI\models\diffusion_models
lightx2v_I2V_14B_480p_cfg_step_distill_rank64_bf16.safetensors
https://huggingface.co/Kijai/WanVideo_comfy/blob/main/Lightx2v/lightx2v_I2V_14B_480p_cfg_step_distill_rank64_bf16.safetensors
📁 ComfyUI/models/loras
umt5-xxl-enc-bf16.safetensors
https://huggingface.co/Kijai/WanVideo_comfy/blob/main/umt5-xxl-enc-bf16.safetensors
📁 ComfyUI\models\text_encoders
Wan2_1_VAE_bf16.safetensors
https://huggingface.co/Kijai/WanVideo_comfy/blob/346ea0b6848edd2aa7e34d0444b2b05ebc7bd97a/Wan2_1_VAE_bf16.safetensors
📁 ComfyUI\models\vae
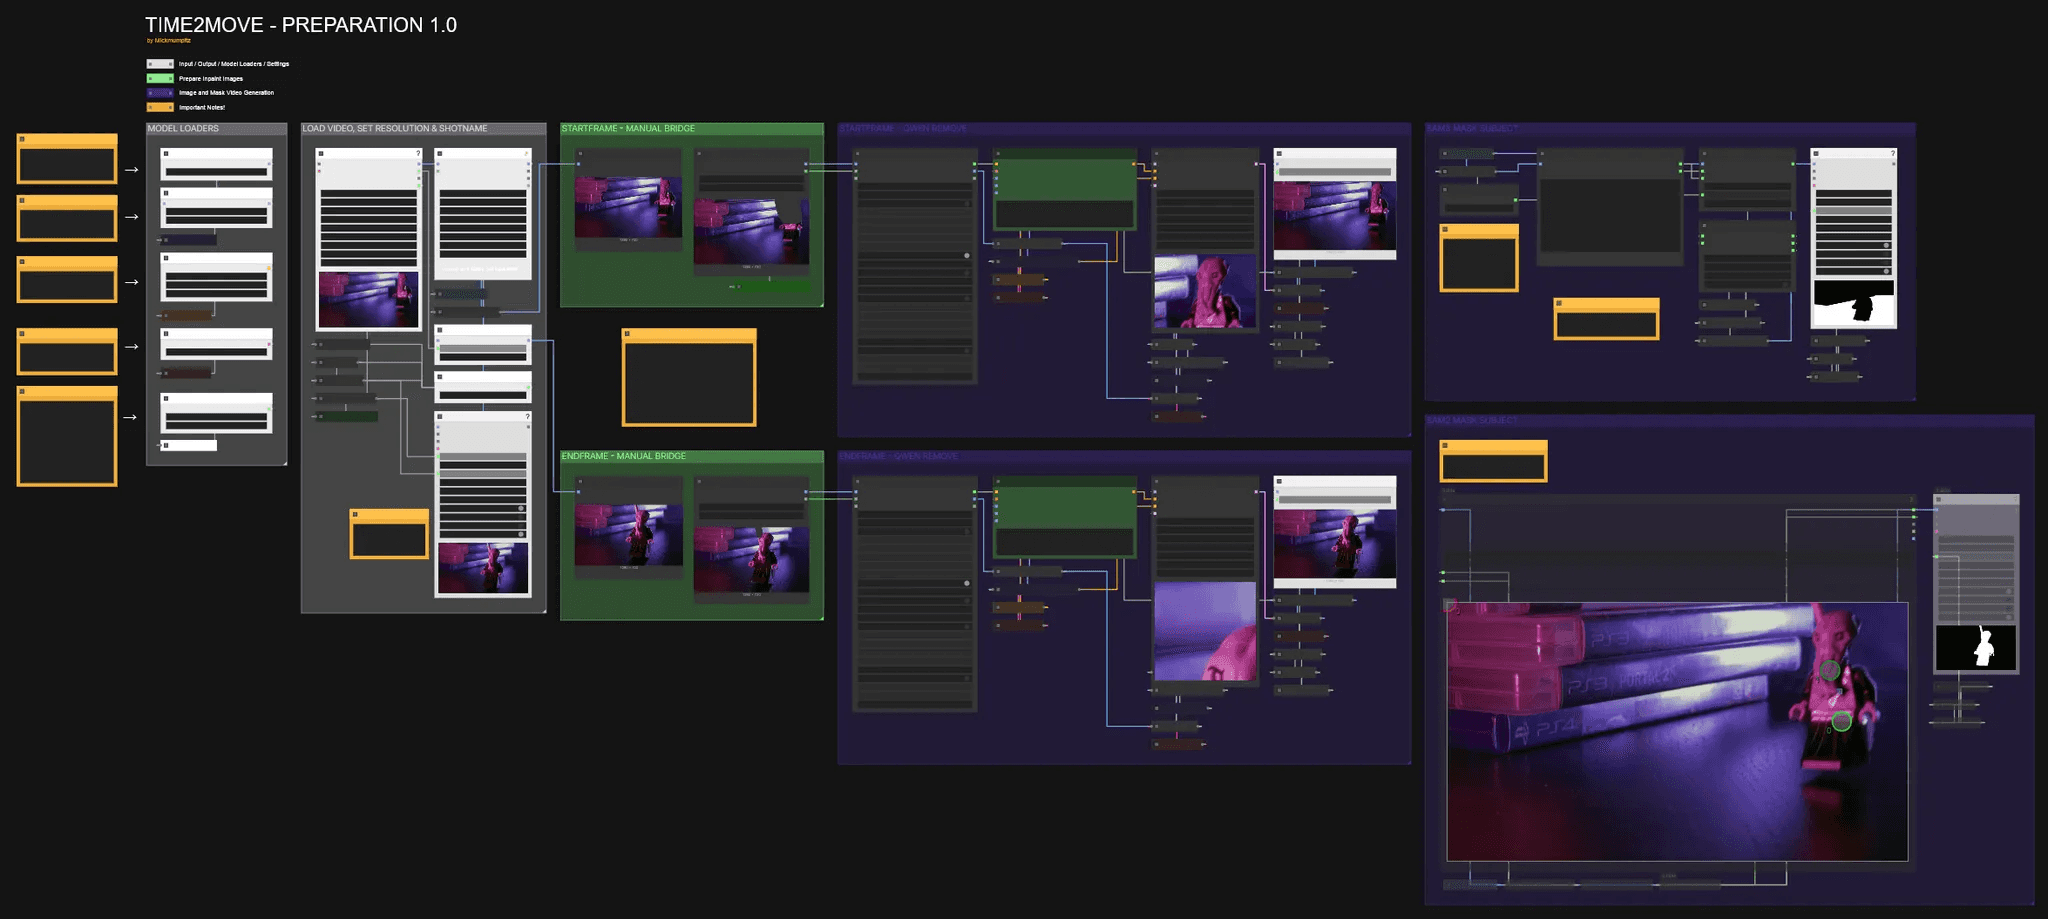
Preparation Workflow
🎨 Workflow Sections
⬜ Input / Output / Model Loaders
🟩 Prepare Inpaint Images
🟪 Image and Mask Video Generation
🟨 Important Notes
Installation
Download the workflow and drag it into ComfyUI. Install any missing custom nodes if prompted.
Download Models
Models for Preparation Workflow
Qwen-Image-Edit-GGUF
https://huggingface.co/QuantStack/Qwen-Image-Edit-GGUF/tree/main
📁 ComfyUI/models/unet/gguf The Q5 version is recommended!
Qwen-Image-Edit-2509-Lightning-4steps-V1.0-fp32:
https://huggingface.co/lightx2v/Qwen-Image-Lightning/blob/main/Qwen-Image-Edit-2509/Qwen-Image-Edit-2509-Lightning-4steps-V1.0-fp32.safetensors
📁 ComfyUI/models/diffusion_models
qwen_2.5_vl_7b_fp8_scaled.safetensors
https://huggingface.co/Comfy-Org/Qwen-Image_ComfyUI/blob/main/split_files/text_encoders/qwen_2.5_vl_7b_fp8_scaled.safetensors
📁 ComfyUI\models\clip\qwen
qwen_image_vae.safetensors
https://huggingface.co/Comfy-Org/Qwen-Image_ComfyUI/blob/main/split_files/vae/qwen_image_vae.safetensors
📁 ComfyUI\models\vae
sam3.pt
A free Hugging Face account is required. You must also accept the model’s terms before downloading.
You can do this here: https://huggingface.co/facebook/sam3
Approval may take some time.
https://huggingface.co/facebook/sam3/blob/main/sam3.pt
📁 ComfyUI\models\sam3
Alternatively, we have provided a sam2 section that automatically downloads its model.
Models for Time2Move Workflow
Wan2_2-I2V-A14B-HIGH_fp8_e4m3fn_scaled_KJ.safetensors
https://huggingface.co/Kijai/WanVideo_comfy_fp8_scaled/blob/main/I2V/Wan2_2-I2V-A14B-HIGH_fp8_e4m3fn_scaled_KJ.safetensors
📁 ComfyUI\models\diffusion_models
Wan2_2-I2V-A14B-LOW_fp8_e4m3fn_scaled_KJ.safetensors
https://huggingface.co/Kijai/WanVideo_comfy_fp8_scaled/blob/main/I2V/Wan2_2-I2V-A14B-LOW_fp8_e4m3fn_scaled_KJ.safetensors
📁 ComfyUI\models\diffusion_models
lightx2v_I2V_14B_480p_cfg_step_distill_rank64_bf16.safetensors
https://huggingface.co/Kijai/WanVideo_comfy/blob/main/Lightx2v/lightx2v_I2V_14B_480p_cfg_step_distill_rank64_bf16.safetensors
📁 ComfyUI/models/loras
umt5-xxl-enc-bf16.safetensors
https://huggingface.co/Kijai/WanVideo_comfy/blob/main/umt5-xxl-enc-bf16.safetensors
📁 ComfyUI\models\text_encoders
Wan2_1_VAE_bf16.safetensors
https://huggingface.co/Kijai/WanVideo_comfy/blob/346ea0b6848edd2aa7e34d0444b2b05ebc7bd97a/Wan2_1_VAE_bf16.safetensors
📁 ComfyUI\models\vae
Preparation Workflow
🎨 Workflow Sections
⬜ Input / Output / Model Loaders
🟩 Prepare Inpaint Images
🟪 Image and Mask Video Generation
🟨 Important Notes
You can find the WORKFLOWS & EXAMPLE FILES here:

Before You Begin: Thank you for considering supporting us! Since these workflows can be complex, we recommend testing the free versions first to ensure compatibility with your system. We cannot guarantee full compatibility with every system that's why we always provide the main functionalities for free! Please take a moment to read through the entire guide. If you encounter any issues:
|
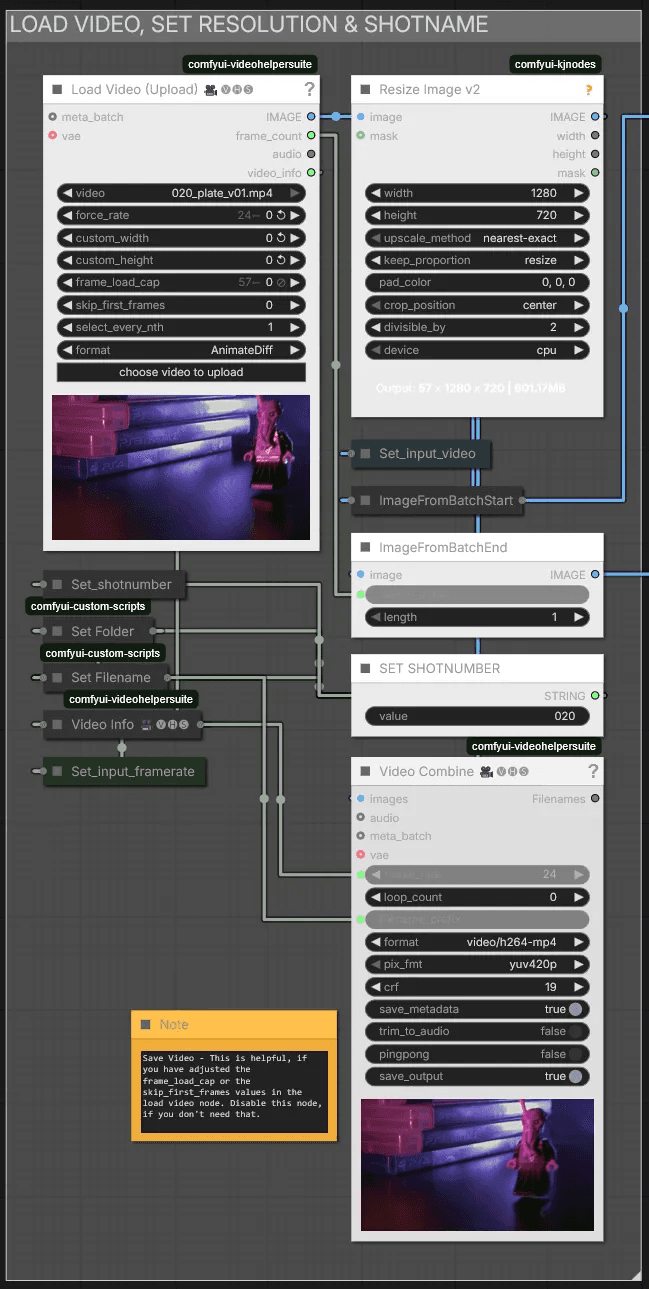
Load Video, Set Resolution & Shotname
After uploading your video, you can adjust the resolution in the Resize Image node—though I recommend keeping it at 720p.
Assign SET SHOTNUMBER a unique number or name for each clip you want to prepare. This saves the outputs in separate folders, making it easy to track the start frame, end frame, and mask video.
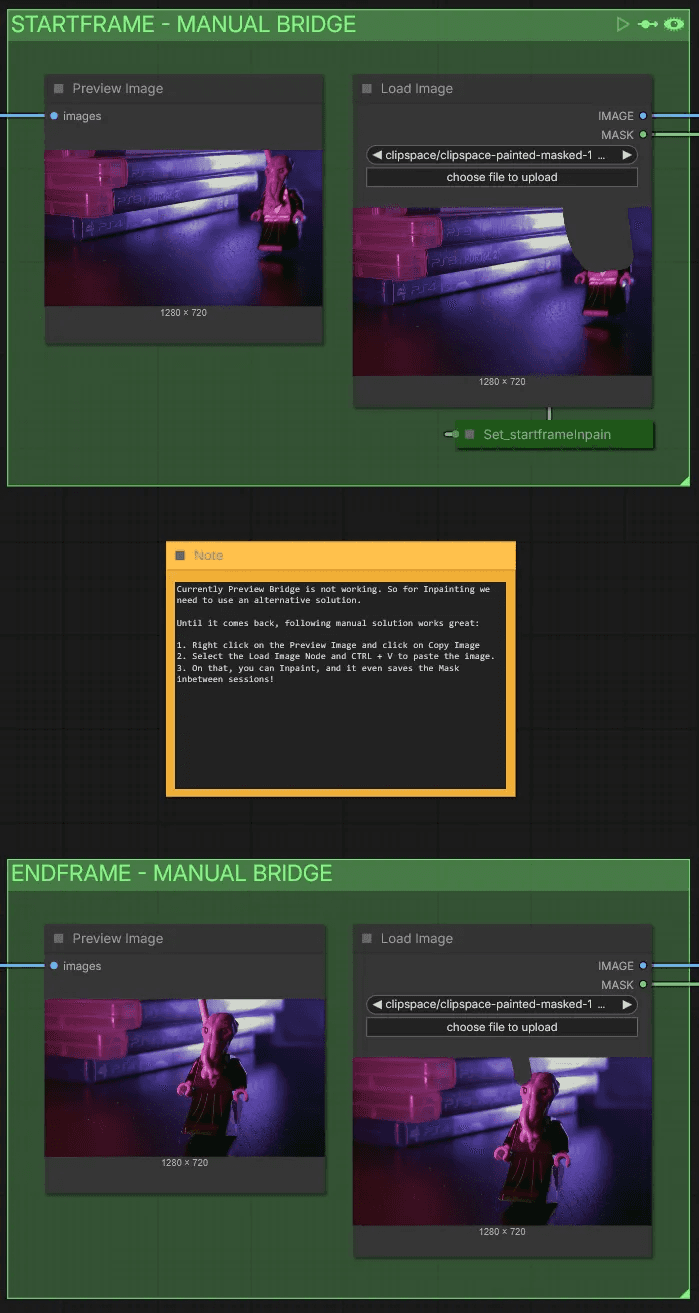
Start Frame & End Frame—Manual Bridge
Preview Bridge isn't currently working, so we need an alternative solution for inpainting.
Until it's restored, this manual workaround works well:
Each Preview Image will grab the first and last frames of the video.
Right-click on the Preview Image and select Copy Image.
Select the Load Image node and press Ctrl + V to paste the image.
You can then inpaint on it—the mask even saves between sessions!
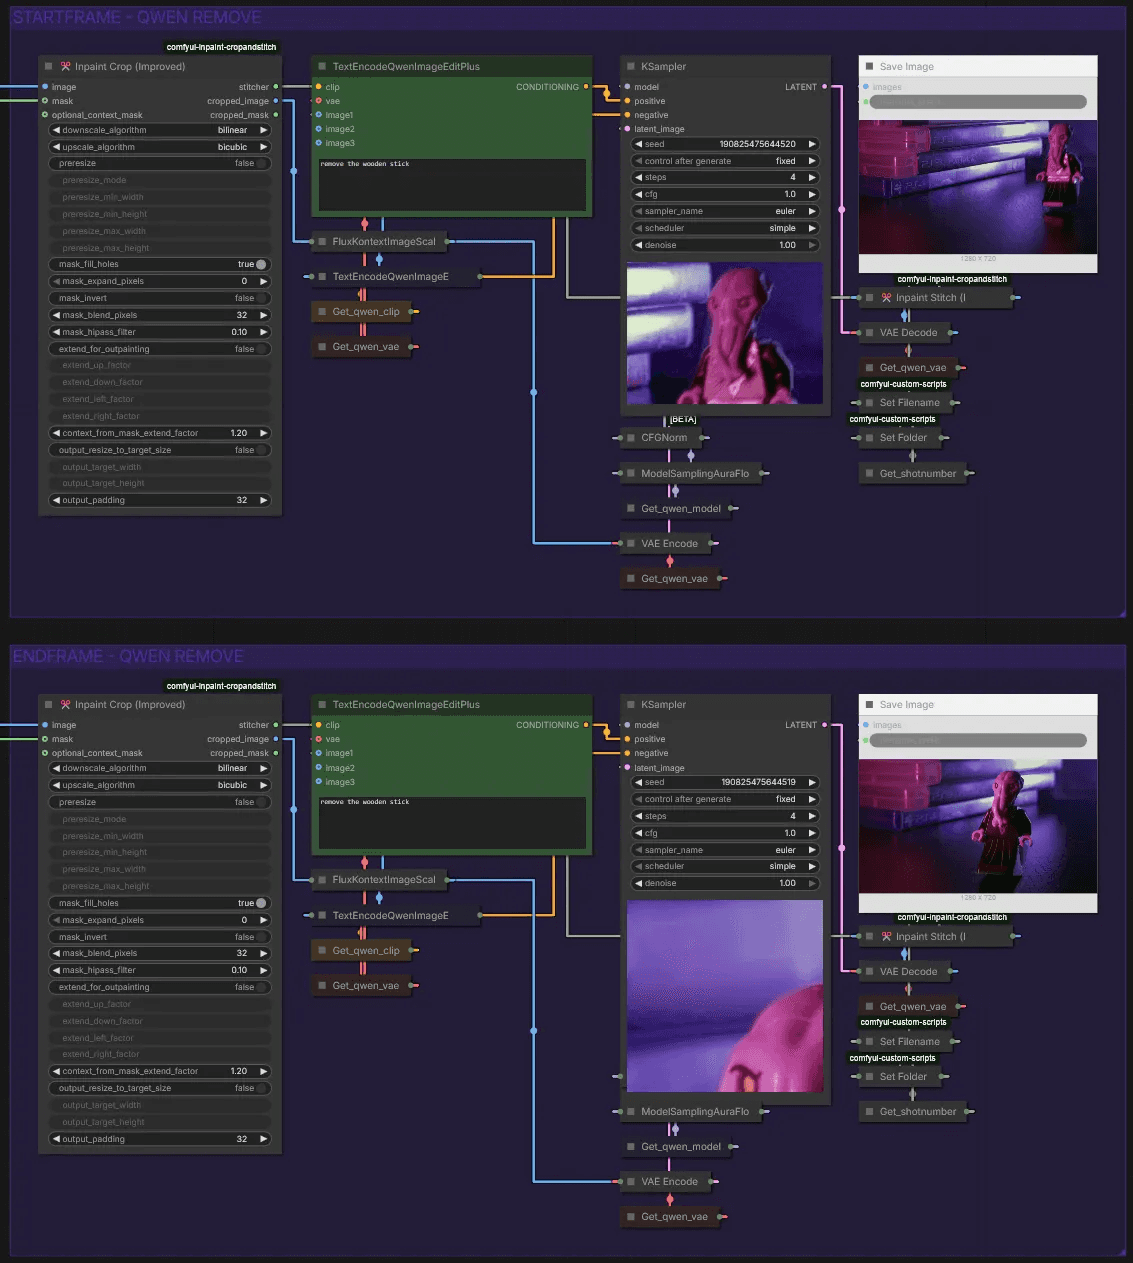
Startframe & Endframe - Qwen Remove
Here we use Qwen to remove the stick. A simple prompt like "remove the wooden stick" works well. If results are inconsistent, try a different seed or expand the mask area.
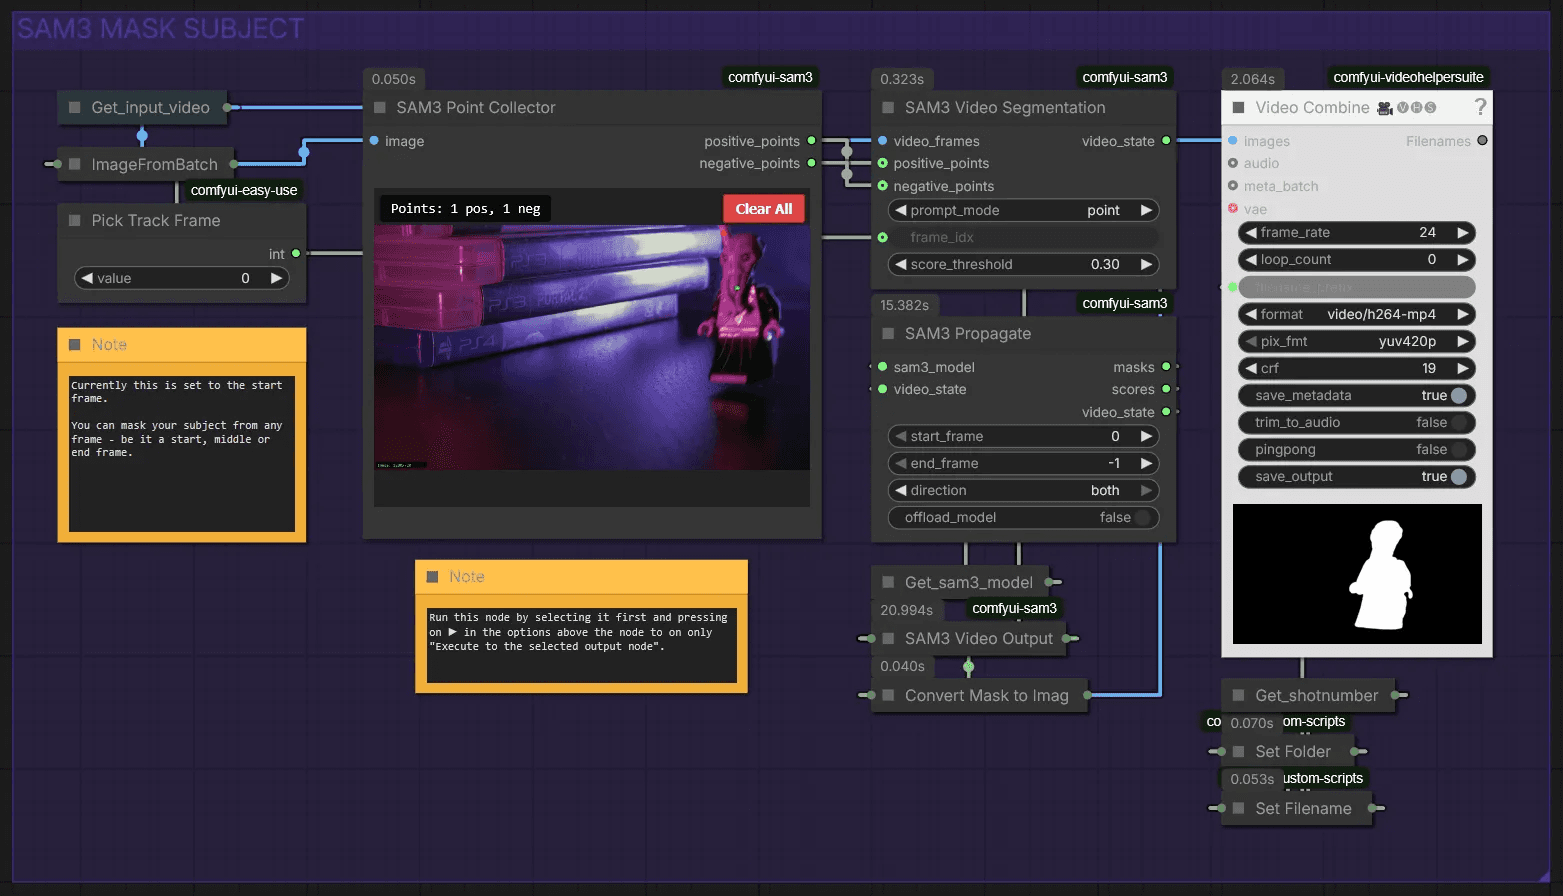
Sam3 Mask Subject
This section automatically creates a mask for your character. If sam3 is too difficult to install, we've provided a sam2 workflow below this section.
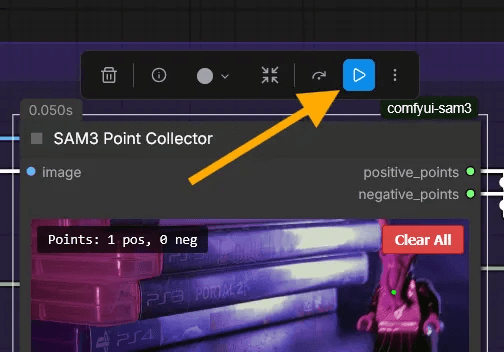
Use Pick Track Frame to select a frame where your character is most visible. Load your image by pressing ▶︎, then left-click to select your character. Right-click to set negative points. We use this to exclude the stick from the mask.
Now you can run the workflow!
Time2Move Workflow
🎨 Workflow Sections
⬜ Input / Output / Model Loaders
🟩 Setup Video
🟪 Sampler
🟨 Important Notes
Load Input
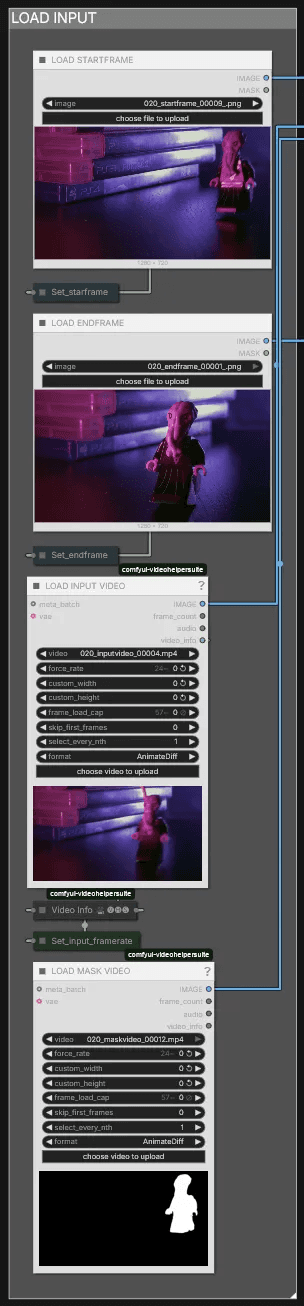
Load everything generated in the Preparation Workflow here. You can upload both the start and end frames, upload only the start frame, or upload only the end frame—all three options work. However, both the input video and mask video are always required.
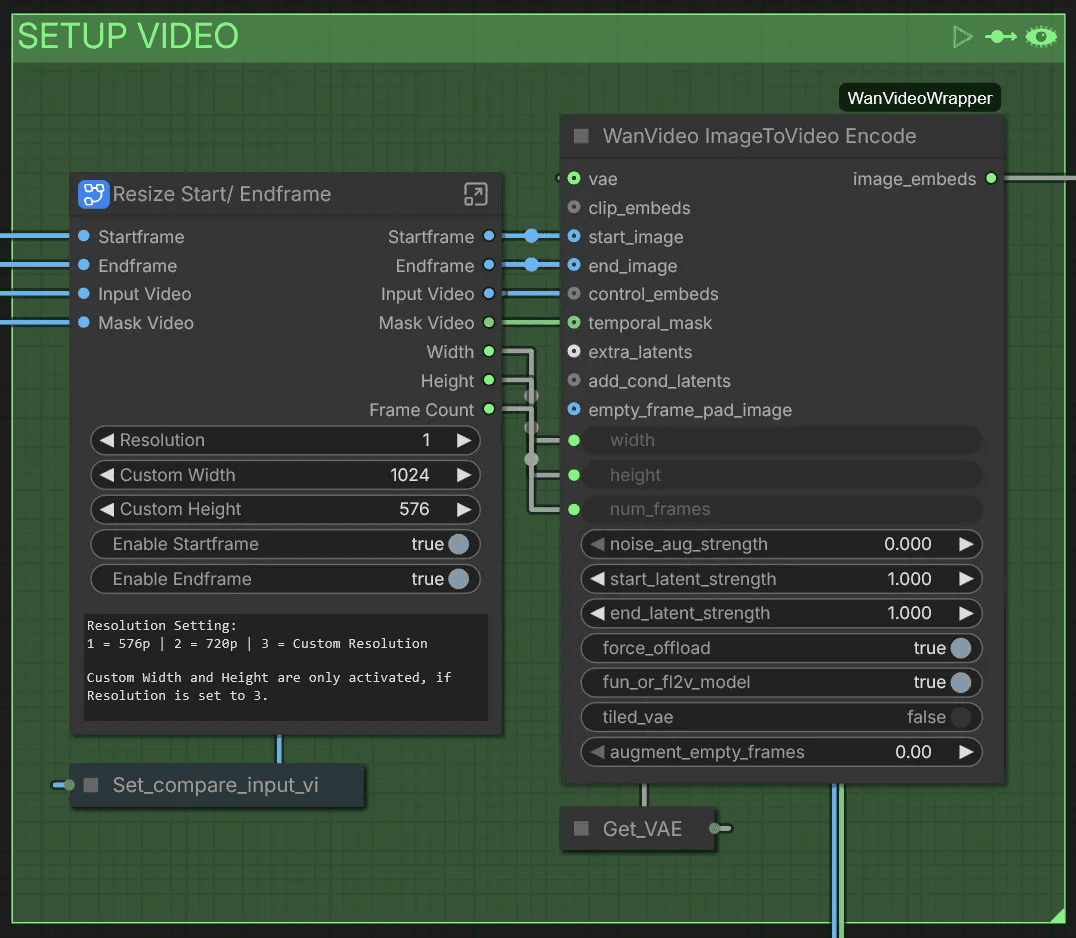
Setup Video
Here you can adjust settings for this workflow. The Resolution switch lets you choose between 576p at 1 and 720p at 2. Set it to 3 to use the Custom Width and Custom Height attributes. If you've uploaded only a start frame or only an end frame, disable the one you haven't loaded.
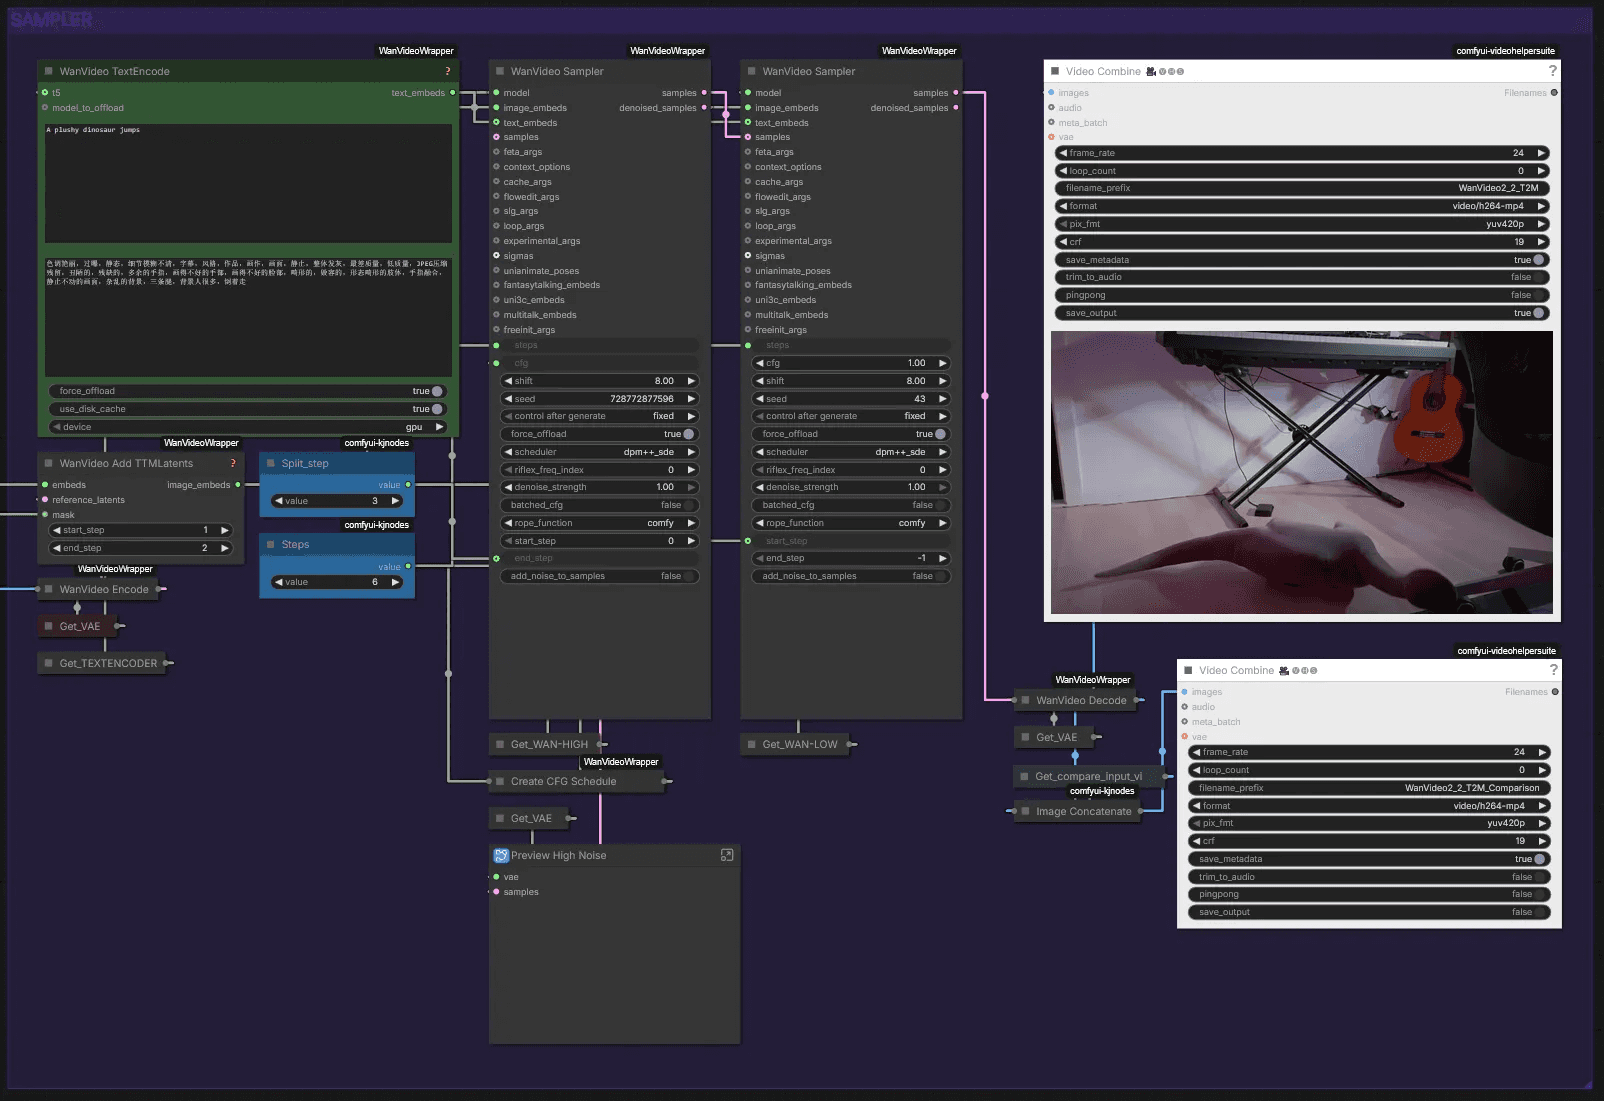
Sampler
Now you can generate your video. We've found that both very precise and very short prompts work well in different circumstances. Start with a short prompt like "A plush dinosaur jumps," then add more detail if needed.
The WanVideo Add TTMLatents is currently set to end_step 2. You can set it to 3 if you want the result to follow the input video more strictly, though our results didn't look as good with that setting.
Load Video, Set Resolution & Shotname
After uploading your video, you can adjust the resolution in the Resize Image node—though I recommend keeping it at 720p.
Assign SET SHOTNUMBER a unique number or name for each clip you want to prepare. This saves the outputs in separate folders, making it easy to track the start frame, end frame, and mask video.
Start Frame & End Frame—Manual Bridge
Preview Bridge isn't currently working, so we need an alternative solution for inpainting.
Until it's restored, this manual workaround works well:
Each Preview Image will grab the first and last frames of the video.
Right-click on the Preview Image and select Copy Image.
Select the Load Image node and press Ctrl + V to paste the image.
You can then inpaint on it—the mask even saves between sessions!
Startframe & Endframe - Qwen Remove
Here we use Qwen to remove the stick. A simple prompt like "remove the wooden stick" works well. If results are inconsistent, try a different seed or expand the mask area.
Sam3 Mask Subject
This section automatically creates a mask for your character. If sam3 is too difficult to install, we've provided a sam2 workflow below this section.
Use Pick Track Frame to select a frame where your character is most visible. Load your image by pressing ▶︎, then left-click to select your character. Right-click to set negative points. We use this to exclude the stick from the mask.
Now you can run the workflow!
Time2Move Workflow
🎨 Workflow Sections
⬜ Input / Output / Model Loaders
🟩 Setup Video
🟪 Sampler
🟨 Important Notes
Load Input
Load everything generated in the Preparation Workflow here. You can upload both the start and end frames, upload only the start frame, or upload only the end frame—all three options work. However, both the input video and mask video are always required.
Setup Video
Here you can adjust settings for this workflow. The Resolution switch lets you choose between 576p at 1 and 720p at 2. Set it to 3 to use the Custom Width and Custom Height attributes. If you've uploaded only a start frame or only an end frame, disable the one you haven't loaded.
Sampler
Now you can generate your video. We've found that both very precise and very short prompts work well in different circumstances. Start with a short prompt like "A plush dinosaur jumps," then add more detail if needed.
The WanVideo Add TTMLatents is currently set to end_step 2. You can set it to 3 if you want the result to follow the input video more strictly, though our results didn't look as good with that setting.
© 2025 Mickmumpitz
© 2025 Mickmumpitz
© 2025 Mickmumpitz